REQUEST A QUOTE

3D Metrology Systems – Defect Detection on Molded Parts

At EDM Intelligent Solutions, our high-resolution 3D scans of piece parts allow for form measurement down to the µm scale. Form measurements are made by cutting profiles across the 3D part scan data set and those included points are used to gather various form dimensions including radii, angles, slot width, height step and more. This ability to measure the 3D data allows us to also search for defects within the scanned surface.

Below is an example of defect detection that was completed on a molded plastic shell for a piece of medical equipment. 3D measurements can easily detect defects on the surface of nearly any part and are less susceptible to lighting issues than images captured with traditional 2D cameras.  The defect scan and 3D measurements of this component were completed using our RSH-M10 Robotic Metrology System. This is a three-step process.


APPLICATION DETAILS

  • Component – Medical Equipment Shell
  • Material – Molded Plastic
  • Metrology Services:
    • Form Measurement
    • Defect Detection

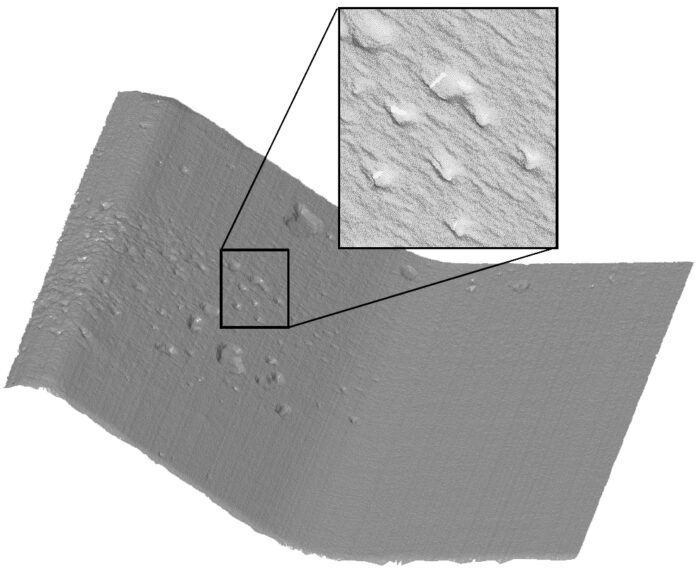
Step 1: Capture Data

A 3D rendering displays a topographical map of a surface, possibly Martian terrain, with an inset showing a magnified view of ripple-like formations and small, scattered rocks or pebbles. The main view reveals a gently sloping landscape dotted with irregular mounds and depressions, suggesting erosion or deposition processes. The magnified inset highlights fine-grained textures and elongated, wave-like patterns, possibly indicating wind-driven sand ripples or similar geological features.

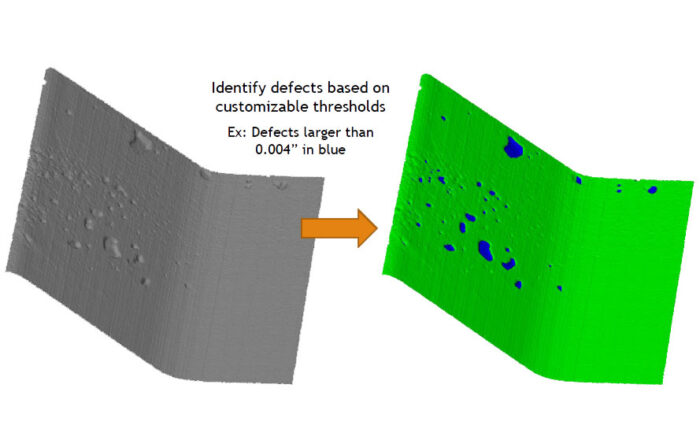
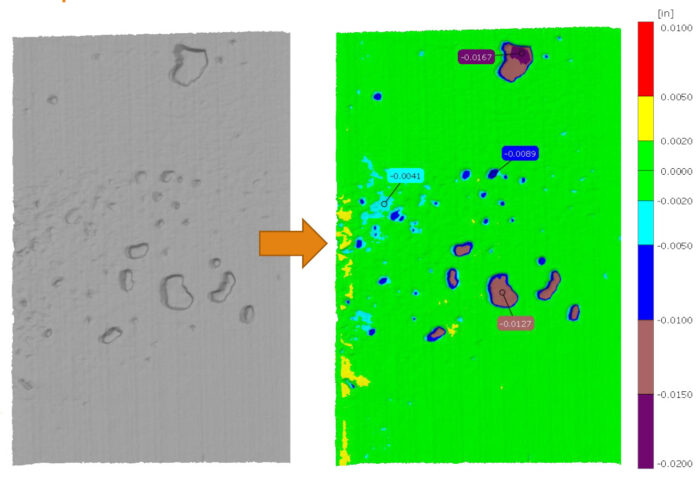
Step 2: Extract and Measure Data

The image illustrates a defect detection process where surface imperfections are identified based on customizable thresholds. The left side shows a 3D surface scan with subtle irregularities, while the right side displays the same surface with defects highlighted in blue, indicating they are larger than 0.004 inches, against a green background representing the acceptable surface.
The image displays a 3D surface scan on the left, showing a textured surface with several circular indentations. An orange arrow points to a corresponding 2D color-coded map on the right, which quantifies the depth or height variations of these indentations. A color bar on the far right indicates that green represents a reference plane (0.0000), while blues and purples represent depths ranging from -0.0020 to -0.0200 inches, and reds and yellows represent heights above the reference. Specific points are labeled with their measured deviations, such as -0.0167, -0.0089, -0.0041, and -0.0127 inches, highlighting the significant depressions on the surface.

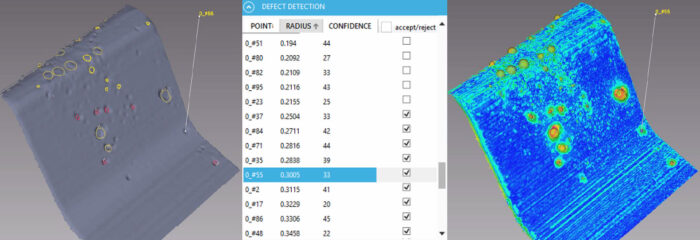
Step 3: Report Results

The image displays a 3D surface analysis software interface, showcasing defect detection on a metallic component. The left panel presents a 3D model with detected defects highlighted in yellow and red circles, indicating potential surface imperfections. To the right of the model, a table lists identified points, their radii, and confidence scores, with checkboxes for accepting or rejecting each defect. The rightmost panel provides a color-coded heatmap visualization of the surface, where warmer colors like yellow and orange represent areas with higher defect probability or severity, contrasting with the cooler blue tones indicating smoother or defect-free regions. The highlighted row in the table corresponds to point '0_#55' with a radius of 0.3005 and a confidence of 33.

COMPETITIVE 3D METROLOGY, MEASUREMENT, AND INSPECTION SERVICES

Intelligent solutions to manufacturing and measurement challenges are what we do. Over the past 25 years, we’ve completed thousands of measurement and metrology projects. What differentiates EDM Intelligent Solutions 3D Metrology services from the competition is our unique understanding of each manufacturing process. The EDMIS metrology technicians and applications engineers support their colleagues in our tight tolerance CNC machine shop that produces ultra-precision components for customers every day. Harnessing this unique relationship with manufacturing, our metrology team has the experience needed to fully assist our customers leverage the measurements taken of their components to improve their manufacturing processes. We are confident that we can measure your most challenging components and work with you to fully understand what those measurements tell you about them. To learn more about how EDMIS can help you, contact our metrology team with your request for quote.